
本文轉載自 Leon 的網誌
Passenger 是在 web server 後面負責調度 web app 的 app server,關於怎麼理解 web server、app server、app 三者間的關係,我們可以看一下下面這張 Passenger 文件內的架構圖: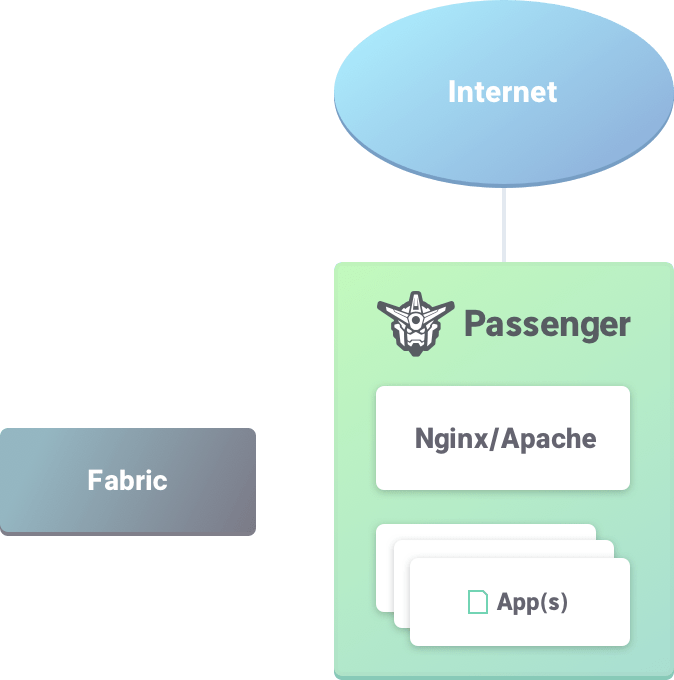
App Server
為何需要 app server 的角色?以一個 Rails app 來說,在開發階段只會用到 Rails 預帶的 Puma 或 Webrick 做為 web server,可是在正式環境必須有專職的 web server 在最前面負責與客戶端進行交涉,也就是大家都知道的 Caddy 或 Nginx 或 Apache 的角色,web server 相當擅長於處理與客戶端之間的 HTTP(S) 協議,問題是它不知道如何與 Rails app 協同作業,在 PHP 的世界,我們有 PHP-FPM 做為 PHP 與 web server 間的溝通橋樑,在正確的組態設定下,web server 知道哪些請求可以由自己回應給客戶端,而哪些請求必須往後送給 PHP-FPM 去做處理回應後再轉回應給客戶端,類似的情境在 Ruby 的世界裡,就是由 Passanger 扮演著類似 PHP-FPM 的角色,Passenger 除了當 web server 與 Rails app 間溝通的橋樑外,還負擔調度 Rais app 的資源以及其它一些監控等的週邊措施,這樣的角色就是 app server,除了前面舉例的 PHP-FPM,Java 世界的 Tomcat 也是類似於這樣的角色。
Passenger 的三種模式
了解了 app server 的角色之後,來談談 Passenger 如何與 Nginx / Apache 協同作業。
我們知道 Nginx 或 Apache 都有模組的概念,可以掛上第三方模組來擴充功能,Passenger 就是以模組的方式掛上 web server,如下圖所示: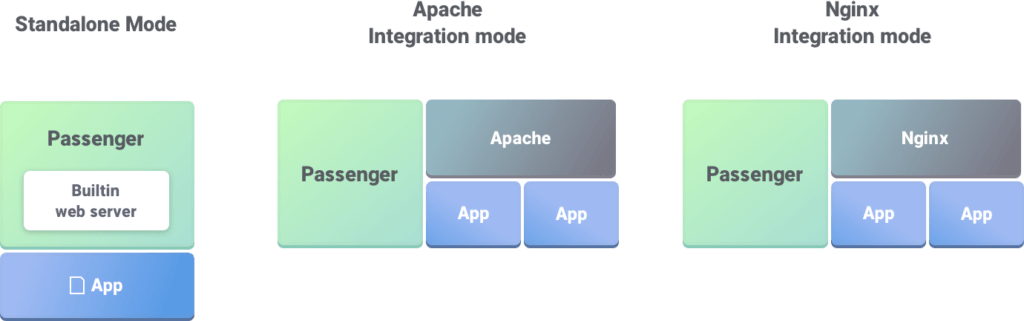
除了 Nginx / Apache 整合模式外,另外一種 standalone 模式比較特別,它也是與 Nginx 共同工作,不一樣的點是反過來以 Passenger 為主要的配置設定對象,情境較單純,下面的篇章也都會以 standalone 模式為範例,等走過 standalone 模式後再往較複雜的整合模式走。
Passenger 與 Web Framework
前面談完 Passenger 是以 web server 的模組來運作,那麼 Passenger 又是如何做為 Rails 的 app server呢?在 Ruby 的世界有個與 web server 溝通的標準介面 Rack,只要 app server 與 web framework 都遵循 Rack 的標準介面去實做,那雙方就可以透過這個介面來溝通,例如 Rails 就是一個有實做 Rack 介面的 web framework,Passenger 當然也是一個有實做 Rack 介面的 app server。
雖然前面一直講 Passenger 與 Rails,不過其實 Passenger 不只可以做為 Ruby 的 app server,因為它的主要程式是以 C++ 開發的,只是初期只實做 Rack 介面,所以才會有 Passenger 只給 Ruby 用的印象,實際上現在的 Passenger 也實做了 Python 的 WSGI 標準,意即 Passenger 也可以作為 Python web framework 的 app server,不僅如此,Passenger 6 增加了 General Language Support 的特性,利用類似 reverse proxy 的方式,號稱能支援所有的語言(狂),不過實際上到底用起來運作的如何還有待驗證。
Passenger Standalone 的安裝
Passenger 的安裝方式大致可以分為兩條路:
- OS 套件(DEB 或 RPM)
- Ruby 套件(gem)
要走那條路取決於後面的 app 是不是 Ruby,是 Ruby app 的話大多會用 gem 的方式安裝與配置,而這篇並不打算以 Ruby app 為範例,所以會以 OS 套件的方式來做安裝,然而前面提到過 Passenger 核心程式是以 C++ 開發,但是週邊的一些工具還是必須依賴 Ruby,所以在作業系統內還是得先裝好 Ruby。這裡我們從已經裝了 Ruby 的一台 Ubuntu 18.04 LTS 為範例,注意,在 Ubuntu 預帶的套件庫內也可能有 Passenger,不過版本過於老舊,我們不會採用,而使用 Passenger 自行維護的套件庫。依照 Passenger 的文件走,先安裝 Passenger 的 APT 套件庫的金鑰:
> sudo apt install dirmngr gnupg
> sudo apt-key adv --keyserver hkp://keyserver.ubuntu.com:80 --recv-keys 561F9B9CAC40B2F7
> sudo apt install apt-transport-https ca-certificates
再加一下 Passenger 的 APT 庫:
> sudo sh -c 'echo deb https://oss-binaries.phusionpassenger.com/apt/passenger bionic main > /etc/apt/sources.list.d/passenger.list'
更新 APT 套件庫索引然後安裝 Passenger:
> sudo apt update
> sudo apt install passenger
最後跑一下 Passenger 的檢查程式:
$ passenger-config validate-install
就是這麼簡單。
除了 Windows 以外的其它作業系統可以參照 Passenger 的文件自行跟進學習,Windows 因為不被 Passenger 原生支援,所以只能心領神會了,或是試試看用 WSL 來當作學習測試環境,就這麼簡單。(?!)
Passenger Standalone 的使用
使用會分成兩個部份講,一是 Passenger 與 web app 之間的搭配組態設定;二是 Passenger 自己本身的命令列操作。
前面都在講 Ruby,這裡我們要突然翻盤拿 Passenger + Masonite 來做範例,Masonite 是一個低效能的 Python WSGI web framework,透過前面的介紹我們可以了解到 Passenger 與 Masonite 可以依照雙方的 WSGI 標準介面來做溝通。
在一個典型的 Masonite app 內,應該會看到如下的目錄結構:
.
├── ./app
├── ./bootstrap
├── ./config
├── ./craft
├── ./databases
├── ./LICENSE
├── ./__pycache__
├── ./README.md
├── ./requirements.txt
├── ./resources
├── ./routes
├── ./storage
├── ./tests
└── ./wsgi.py
看最下面一行,專案根目錄內的 wsgi.py 即 Masonite 的 WSGI 實做介面,看一下內容:
"""First Entry For The WSGI Server."""

from masonite.app import App

from bootstrap.start import app
from config import application, providers

"""Instantiate Container And Perform Important Bindings
Some Service providers need important bindings like the WSGI application
and the application configuration file before they boot.
"""

container = App()

container.bind('WSGI', app)
container.bind('Application', application)
container.bind('Container', container)

container.bind('ProvidersConfig', providers)
container.bind('Providers', [])
container.bind('WSGIProviders', [])

"""Bind all service providers
Let's register everything into the Service Container. Once everything is
in the container we can run through all the boot methods. For reasons
some providers don't need to execute with every request and should
only run once when the server is started. Providers will be ran
once if the wsgi attribute on a provider is False.
"""

for provider in container.make('ProvidersConfig').PROVIDERS:
    located_provider = provider()
    located_provider.load_app(container).register()
    if located_provider.wsgi:
        container.make('WSGIProviders').append(located_provider)
    else:
        container.make('Providers').append(located_provider)

for provider in container.make('Providers'):
    container.resolve(provider.boot)

"""Get the application from the container
Some providers may change the WSGI Server like wrapping the WSGI server
in a Whitenoise container for an example. Let's get a WSGI instance
from the container and pass it to the application variable. This
will allow WSGI servers to pick it up from the command line
"""

application = container.make('WSGI')
扣掉註解後其實沒有很多行,一樣直接跳到最後一行 application = container.make('WSGI'),定義了一個 application,依照 WSGI 的設計,WSGI server (Passenger) 會把客戶端請求送交給 application, application 負責接受請求並回應 HTTP 狀態與內容。
根據上面的描述,我們得讓 Passenger 去知道如何呼叫 application,依照 Passenger 的設計,Passenger 啟動時會去執行 passenger_wsgi.py 這個檔案,因此我們手動在 Masonite 專案根目錄內新增 passenger_wsgi.py 並寫入以下內容:
from wsgi import application
讓 Passenger 知道該去呼叫來自 wsgi.py 內的 application。
把 Passenger 跑起來:
> passenger start

=============== Phusion Passenger Standalone web server started ===============
PID file: /home/leon/Git/MasoniteDemo1/passenger.3000.pid
Log file: /home/leon/Git/MasoniteDemo1/passenger.3000.log
Environment: development
Accessible via: http://0.0.0.0:3000/

You can stop Phusion Passenger Standalone by pressing Ctrl-C.
Problems? Check https://www.phusionpassenger.com/library/admin/standalone/troubleshooting/
===============================================================================
由 Passenger 給出的訊息我們可以知道埠號在 3000,開瀏覽器驗證一下:
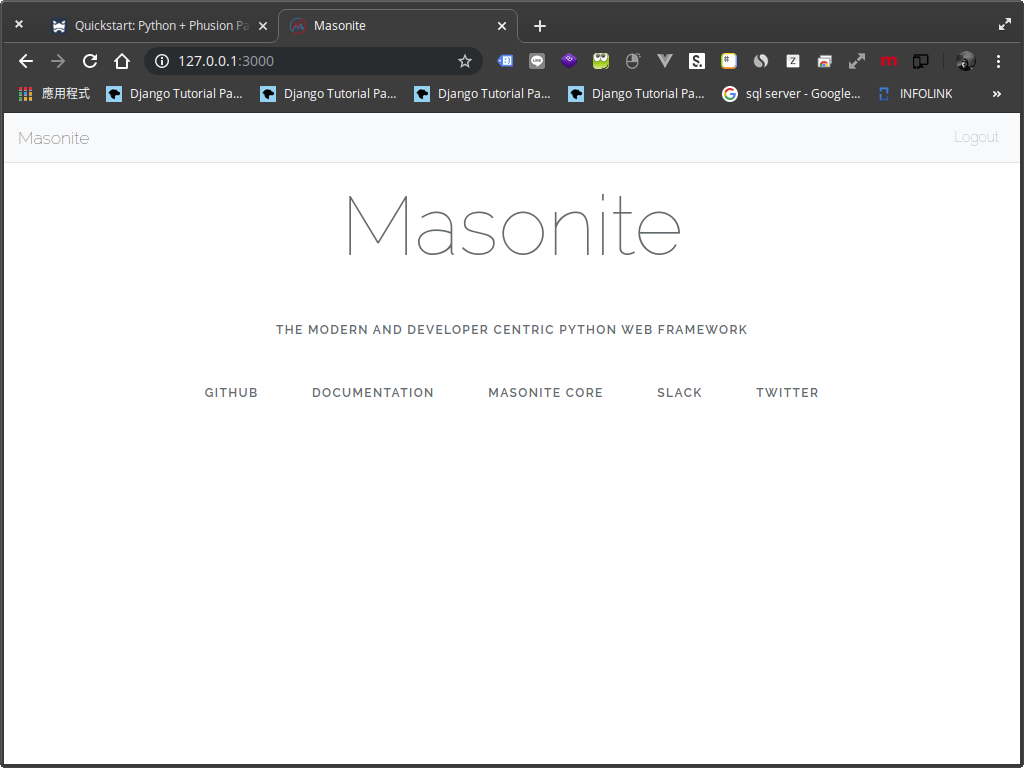
賀!順利看到了 Laravel Masonite 的啟始畫面。
按下 CTRL-C 即可停止 Passenger,或是開另外一個終端機再執行 passenger stop 也可停止 Passenger。
Passengerfile.json
Passenger 有許多的設定,除了透過 passenger 命令的參數形式設定外,比較正規的做法應該是透過 Passengerfile.json 的設定檔來設定,passenger start 的時候會自己去讀 Passengerfile.json 的設定。具體有哪些設定項目多如繁星,請參閱 Passenger 的文件。
結論
這篇介紹了 app server 的角色與架構,以及 Passenger 和 Masonite 之間的整合,但其實以上的介紹都還僅適用於開發環境,在正式環境中還有許多課題需要完成,包括 Python 的虛擬環境設定與 Passenger 的整合、Passenger 的安全性與效能設定、Passenger 與 web server 的整合這幾點都未加著墨,以後有機會再逐篇把我們走過的經驗分享出來。Share


作者:六小編
不是五小編也不是七小編,就是六小編。


本文由 INFOLINK 聯騰資訊股份有限公司提供,聯騰資訊專注於為零售與餐飲產業提供智慧化的系統解決方案,以 ERP 為核心為客戶開拓 E 化應用,與 POS、BI、EC 等應用實現無縫整合,我們在此分享我們對產業與技術的觀點,歡迎與我們交流或追蹤我們。