本文轉載自 Leon 的網誌
Orator 是 Python 世界內的一套 ORM,介紹 Orator 前先簡單介紹 ORM,ORM 全稱 object-relational mapping,它是協助程式語言操作資料庫的中間人,ORM 把資料庫的 table 對應到程式內的 class,而 table 內的一筆紀錄則是對應到程式內的物件,紀錄內的欄位則是對應到物件的屬性,除了資料的對應外,其他增刪改動作也都有 ORM API 函式可以呼叫,如果 table 是有關聯性的,在程式內也可以設定 class 間的關聯性。
ORM 把資料庫的操作物件化後,在程式專案內就可以不用寫 SQL,可以以操作一般物件的方式去對待資料庫,有了 ORM 的基礎觀念之後,再引入 MVC 架構的 model 角色——model 是抽象化的概念,具體對應到的也是程式的 class,因此我們可以把 table、class、model 三者視為同一個對象,只不過在不同的面向上有不同的稱呼,table 是 class 與 model 真正在資料庫內被儲存的那面,class 是 table 與 model 在程式語言內操作邏輯那面,model 是 table 與 class 在應用面被人們談及的抽象的那面。
Orator ORM 的特色
盤點 Python 的 ORM,最常見的應該是 SQLAlchemy ORM,相較於 SQLAlchemy ORM,Orator ORM 有一些特點:
- 封裝更高階,以 session 管理為例,SQLAlchemy ORM 提供更多底層操作,而 Orator ORM 的 API 簡單許多。
- 約定大於配置,不僅 API 簡單,Orator ORM 在定義 model 上也很簡單,Orator ORM 致敬的對象是 Rails 的 ActiveRecord,因此包括 table name 等都是依照約定自動配置,不需要人工命名,此外 model 的屬性也是不用一一定義的,只要定義 model 間的關聯性就好。
- 不綁定框架,與 ActiveRecord 不同的是 Orator ORM 本身是獨立套件,可以與任何其他框架合作,沒有 ActiveRecord 和 Rails 高度耦合的問題。
- 支援 PostreSQL、MySQL、SQLite。
- 支援 migration、seeding 等操作,透過 Orator ORM 提供的 CLI 工具
orator可以產出 migration 與 seeding 的空白模板檔,因為有 migration 腳本,所以資料庫 schema 的變更也都可以納入版控管理。 - 用的人少,少之又少,不過開發者也是 Poetry 的開發者,並且還有在持續維護中,所以可以安心使用,不用怕被放生。
上面這些特色,未必都是優點,取決於用的人站在什麼角度看,就以 ORM 來說,趕著 time to market 的產品可能連 ORM 和 web 框架都不用,而用把兩者封裝的更高階的 headless CMS,或是連自架都放棄,採用像 Fauna 或 Backendless 這樣的 backend-as-a-service 服務。
Orator ORM 操作
下面是 Orator ORM 的簡易操作,migration 和 seeding 的部分會用腳本檔執行,ORM 的操作會進入 Python REPL 內執行。
在開始前,先從準備環境開始。
準備環境
我們開一個新的空白 Python 環境 project1 來操作 Orator ORM,關於 Python 的環境建立可以參考另外一篇〈建置 Python 3.9 開發環境〉。
project1 目前還是空的,不過為了避免在後面的過程中迷航,這邊先把目錄結構呈現出來:
project1
├── app.db
├── oratordemo
│   ├── database.py
│   ├── __init__.py
│   ├── migrations
│   │   └── __init__.p
│   └── models
│        └── __init__.py
├── poetry.lock
└── pyproject.toml
上面的目錄結構不需要手動建立,會在下面的過程中逐步建立。
下面的終端機指令都會直接標示所在的位置,省略 cd 指令的部份。
在環境內裝上 Orator ORM:
(project1) ~/project1> poetry add orator
(在這邊我們是用 Poetry 管理環境和套件,如果不是用 Poetry 的朋友請自行代換成對應的命令。) 裝完後在環境內應該就會有 orator 這個 CLI 程式可以用,先跑一下認識它:
(porject1) ~/project1> orator

Orator 0.9.9

Usage:
  command [options] [arguments]

Options:
  -h, --help                      Display this help message
  -q, --quiet                     Do not output any message
  -V, --version                   Display this application version
      --ansi                      Force ANSI output
      --no-ansi                   Disable ANSI output
  -n, --no-interaction            Do not ask any interactive question
  -v|vv|vvv, --verbose[=VERBOSE]  Increase the verbosity of messages: 1 for normal output, 2 for more verbose output and 3 for debug

Available commands:
  help              Displays help for a command
  list              Lists commands
  migrate           Run the database migrations.
 db
  db:seed           Seed the database with records.
 make
  make:migration    Create a new migration file.
  make:model        Creates a new Model class.
  make:seed         Create a new seeder file.
 migrate
  migrate:install   Create the migration repository.
  migrate:refresh   Reset and re-run all migrations.
  migrate:reset     Rollback all database migrations.
  migrate:rollback  Rollback the last database migration.
  migrate:status    Show a list of migrations up/down.
可以看到裡面的命令滿精簡也滿有條理的,大部分都可以望名生義。
設定資料庫連線
如同大多數的資料庫工具,必須先定義要連線的資料庫,前面提過 Orator ORM 支援 PostreSQL、MySQL、SQLite 三種常見的開源資料庫,比較可惜的是並不支援 SQL Server 和 Firebird,這邊我們會用 SQLite。
在目前還是空白的專案資料夾內,建一個 oratordemo/database.py,在裡面定義資料庫的連線參數:
from orator import DatabaseManager, Model

DATABASES = {
  'sqlite': {
    'driver': 'sqlite',
    'database': 'app.db',
  },
}

db = DatabaseManager(DATABASES)
Model.set_connection_resolver(db)
class BaseModel(Model):
  pass
除了連線參數外,我們還引用了 orator 的 Model class,並設定它的連線參數,其他的 model 只要繼承 BaseModel 就能與資料庫連線了!但此時執行這個腳本是沒有任何效果與意義的,我們得先定義 model。
定義 model
先認識一下創建 model 定義腳本的命令:
(project1) ~/project1/oratordemo> orator make:model --help

Usage:
  make:model [options] [--] <name>

Arguments:
  name                            The name of the model to create.

Options:
  -m, --migration                 Create a new migration file for the model.
  -p, --path=PATH                 Path to models directory
  -h, --help                      Display this help message
  -q, --quiet                     Do not output any message
  -V, --version                   Display this application version
      --ansi                      Force ANSI output
      --no-ansi                   Disable ANSI output
  -n, --no-interaction            Do not ask any interactive question
  -v|vv|vvv, --verbose[=VERBOSE]  Increase the verbosity of messages: 1 for normal output, 2 for more verbose output and 3 for debug

Help:
 Creates a new Model class.
我們來定義一個 User 的 model:
(project1) ~/project1/oratordemo> orator make:model User --migration
上面這行會幫我們創建 project1/
from orator import Model

class User(Model):
  pass
在定義 User model 的屬性前,讓我們先關注另一個一起產生的 migration 檔案,因為前面的那行指令有加上 --migration 的參數,所以會一併產生 users table 的 migration 檔,在 project1/
from orator.migrations import Migration
class CreateUsersTable(Migration):
  def up(self):
    """
    Run the migrations.
    """
    with self.schema.create('users') as table:
      table.increments('id')
      table.timestamps()
  def down(self):
    """
    Revert the migrations.
    """
    self.schema.drop('users')
其中的 up() 和 down() 分別是 migration 檔案在建立與撤銷時會被呼叫的函式,這是 ORM migration 的重要特性,因為每個 migration 檔名都帶有時間戳,因此 ORM 是可以根據時間戳對資料庫的 schema 做建立與撤銷的,ORM 也會在資料庫內創建一個特殊的表格用於記錄整個資料庫的 migration 紀錄,而且這一切都是不用人為介入的。
在 migration 腳本裡面也可以看到已經有預放兩個欄位,第一個欄位是自動遞增的 id,第二行 table.timestamps() 會產生兩個欄位,分別是記錄創建時間的 created_at 和紀錄更新時間的 updated_at,這三個欄位也是 ORM 的特性,也是約定優於配置的表現之一,表格間透過 id 來建構關聯性,時間戳則是在程式邏輯內操作 model 物件時會自動打上那兩個時間戳。
在兩個欄位之外,我們再多加幾個欄位進去:
from orator.migrations import Migration
class CreateUsersTable(Migration):
  def up(self):
    """
    Run the migrations.
    """
    with self.schema.create('users') as table:
      table.increments('id')
      table.timestamps()
      table.string('name')
      table.integer('age').unsigned().nullable()
      table.date('birthday').nullable()
def down(self):
    """
    Revert the migrations.
    """
    self.schema.drop('users')
望文生義,上面分別指定了欄位的型態(字串、整數、日期)與額外的屬性(無正負號、可為空值),以及欄位的名稱等。
接著來跑一次 migration:
(project1) ~/project1> orator migrate --config=oratordemo/database.py --path=oratordemo/migrations/

Are you sure you want to proceed with the migration?  (yes/no) [no] yes

Migration table created successfully
[OK] Migrated 2021_01_28_093757_create_users_table
orator 預設會去讀取我們指定的 database.py 內的 DATABASE,並將其認定為與資料庫的連線方式。 此時在專案資料夾 project1 內應該會建出剛剛定義的 app.db,裡面也應該會有我們定義的表格和欄位:
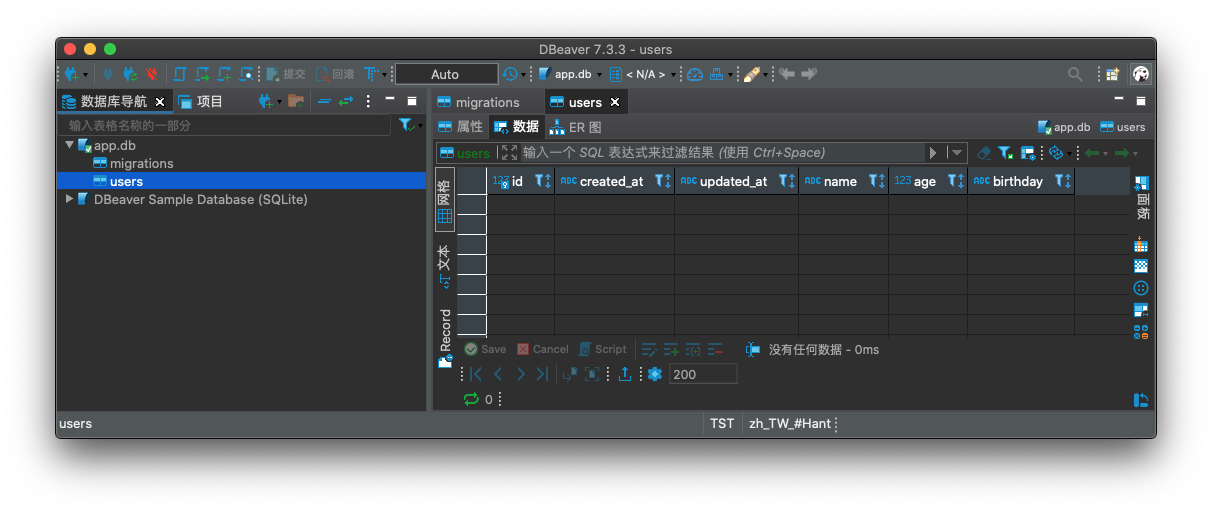
這邊可以看到 ORM 的另一個好處,ORM 會自動幫我們處理底層資料庫 datatype 支援度差異的問題,以 SQLite 為例,它僅支援有限的 datatype,例如在 migration 有定義一個日期欄位 table.date('birthday'),而 SQLite 並不支援日期這樣的 datatype,ORM 就會自動幫我們轉換成 TEXT 的 datatype。
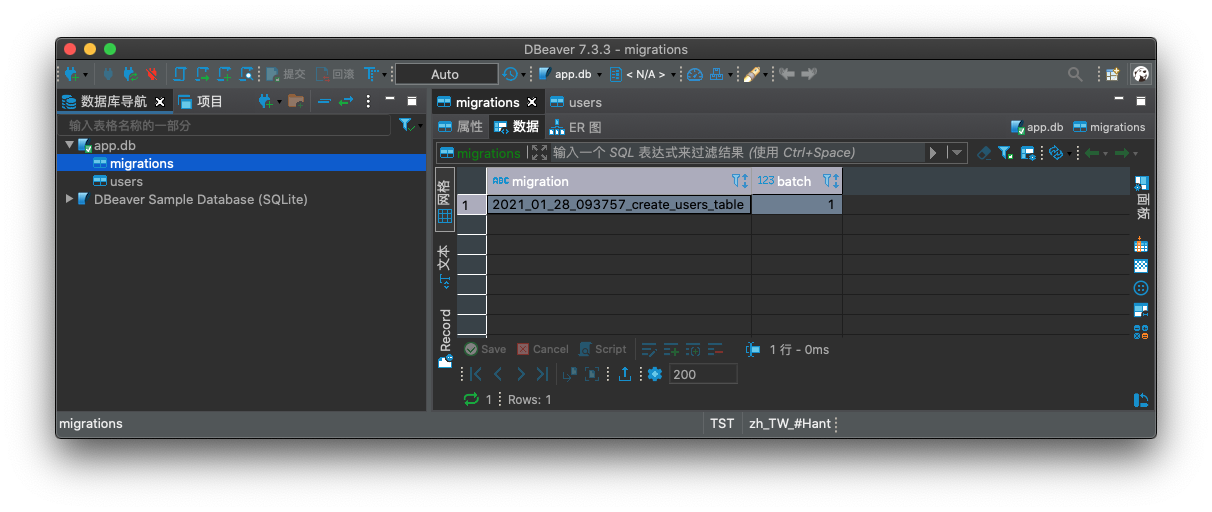
除了我們定義的 users 外,Orator ORM 還自己建了個 migration table 來記錄這個資料庫的異動紀錄:
定義關聯性
我們來定義另一個 Item model,並且讓 User 與 Item 間存在著一對多的關係,也就是一個 User 可以擁有多個 Item。
建立 Item model 的模板檔:
(project1) ~/project1/oratordemo> orator make:model Item --migration
打開 project1/
from orator.migrations import Migration
class CreateItemsTable(Migration):
  def up(self):
    """
    Run the migrations.
    """
    with self.schema.create('items') as table:
      table.increments('id')
      table.timestamps()
      table.integer('user_id').unsigned()
      table.foreign('user_id').references('id').on('users')
      table.string('title')
      table.string('description').nullable()
  def down(self):
    """
    Revert the migrations.
    """
    self.schema.drop('items')
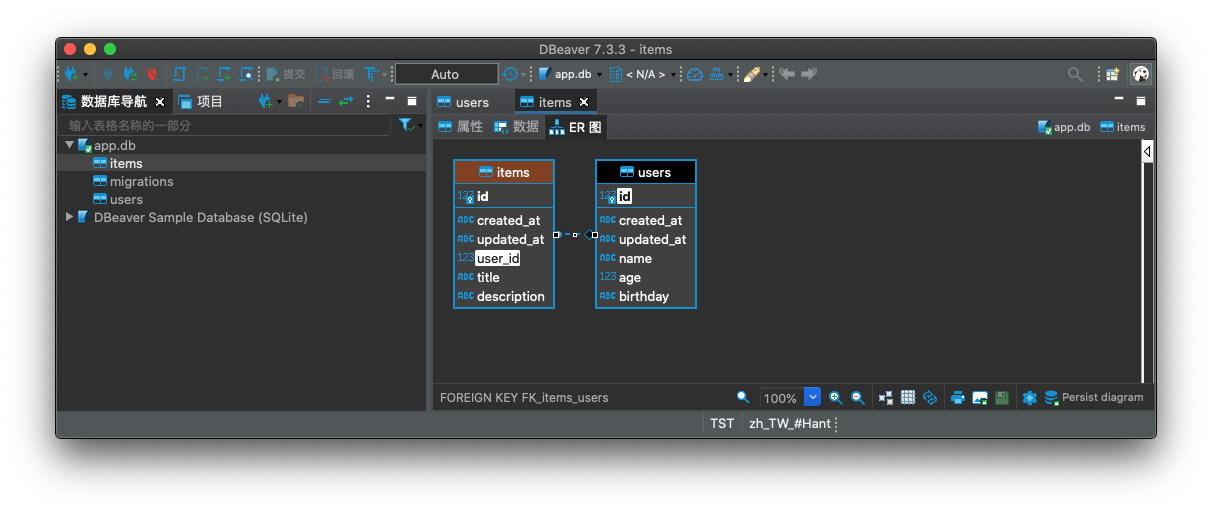
此處定義了 user_id 與 users table 的 id 欄位之間的關聯性。
跑一次 migration:
(project1) ~/project1> orator migrate --config=oratordemo/database.py --path=oratordemo/migrations/
看一下資料庫的關聯性:
是不是妖受讚!
到目前爲止,我們定義了 User 與 Item 兩個 model,也建立了資料庫內的相對應的 schema,但目前的實際操作(建資料庫、表格、欄位、關聯性等)都僅及於資料庫方面,在 Model 方面至今還是只有兩個空白的模板檔(project1/
前面我們在 migration 檔內定義的關聯性的作用也僅止於資料庫,在 model 方面我們需要再次定義關聯性。
project1/
from orator.orm import has_many
from oratordemo.database import BaseModel

class User(BaseModel):

  @has_many
  def items(self):
    from oratordemo.models.item import Item
    return Item
第一行引用了 has_many,用於定義 model 間一對多的關聯性。
第二行引用了我們最前面定義的 BaseModel, 我們定義的所有 model 都會繼承自 BaseModel。
後面的 User 類,裡面定義了與 Item 間一對多的關聯性,值得注意的是在 model 腳本內,我們只需要定義關聯性,不需要去定義其他的屬性,Orator ORM 會自己處理,這點是 Orator ORM 與其他 ORM 較不同的地方。
project1/oratordemo/models/item.py 改寫如下:
from orator.orm import belongs_to
from oratordemo.database import BaseModel

class Item(BaseModel):

  @belongs_to
  def user(self):
    from oratordemo.models.user import User

    return User
這裡引用了另外一個定義關聯性的修飾器 belongs_to,一樣用於指示 Item 與 User 間的關係。
上面兩個 model 的腳本檔有個較奇特之處,在 class 內的關聯性定義函式內竟然有放引用相關類別的敘述 from oratordemo.models.item import Item,不放在外面的原因是放在外面會導致循環引用的問題,所以得放在裡面。
ORM 操作
這部份的操作我們進入 Python REPL:
(project1) project1> python

Python 3.9.0 (default)
Type "help", "copyright", "credits" or "license" for more information.

>>>
先引入我們剛剛定義好的兩個 model:
>>> from oratordemo.models.user import User
>>> from oratordemo.models.item import Item
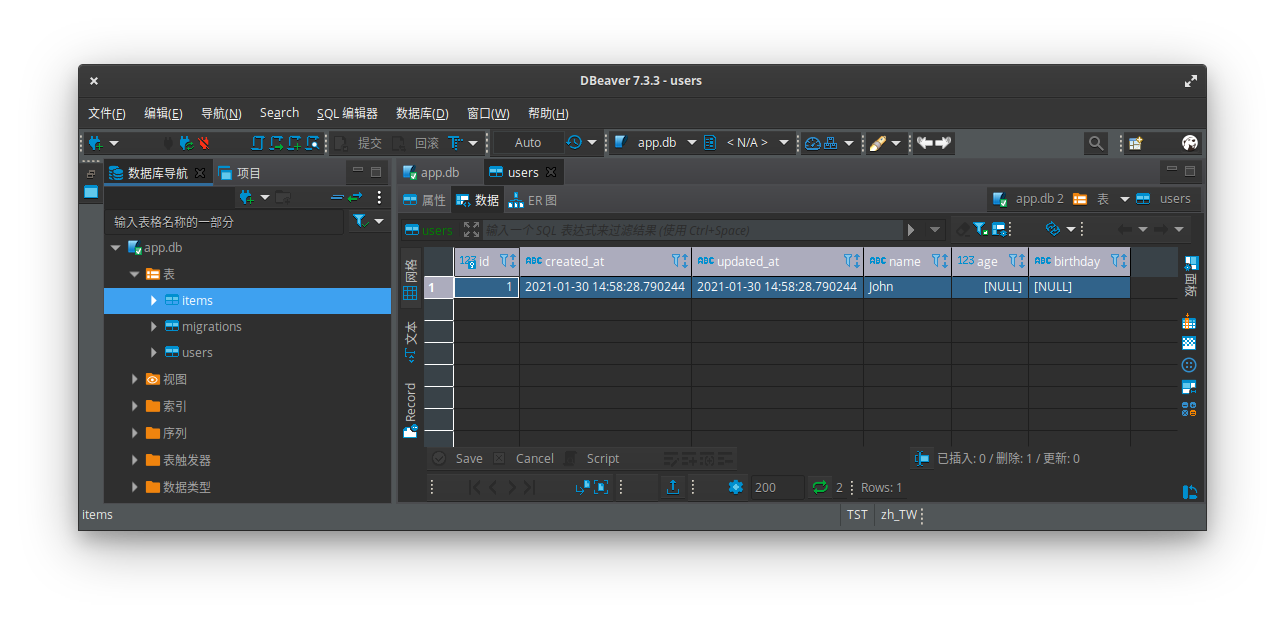
先建個 user 帥一波:
>>> user1 = User
>>> user1.name = "John"
>>> user1.save()
true
>>> user1.id
1
再打開 app.db 確認:
幫 user1 加個 item:
>>> item1 = Item()
>>> item1.title = "Banana"
>>> user1.items().save(item1)
<oratordemo.models.item.Item object at 0x7fa94c828e20>
重新載入一次 user1 就可以讀到剛加入的 item:
>>> user1 = User.find(1)
>>> user1.items.first().title
'Banana'
再看一次 app.db 的內容:
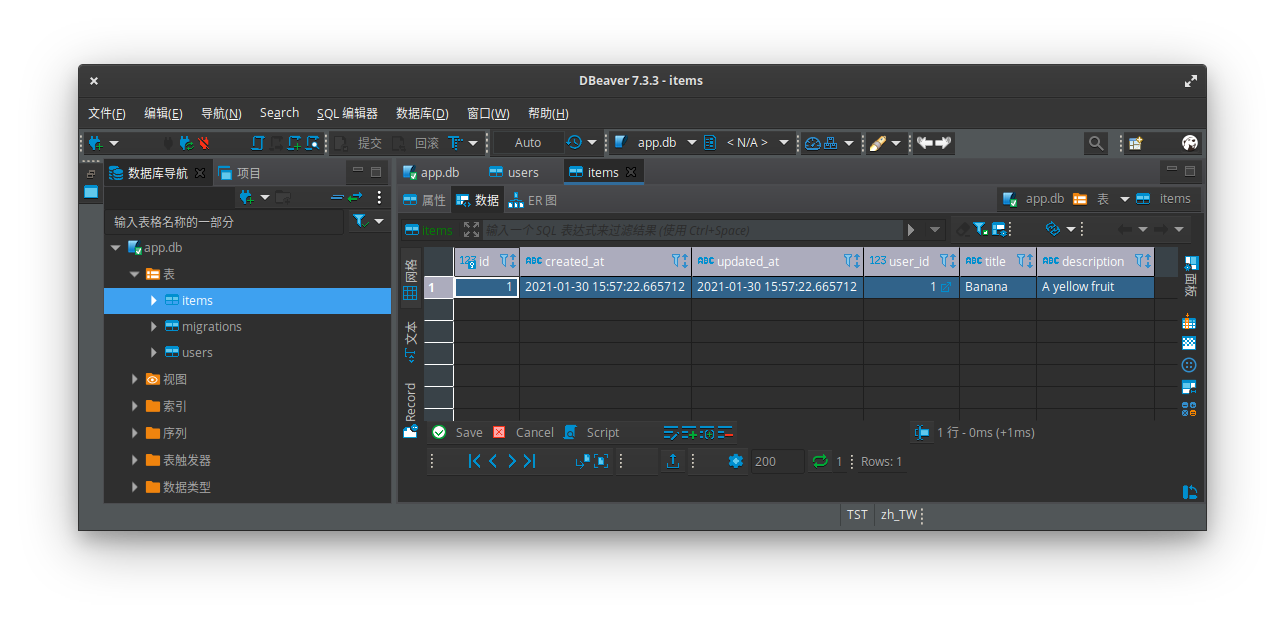
依照我們在 Python REPL 內的操作邏輯,只要在己的專案內引入定義好的 model class,就可以操作資料庫了。
結語
這篇文章簡單介紹了比較易用的 Orator ORM,即便只是簡單介紹,卻也寫了不短的篇幅,在寫的過程中也促使自己重新複習了 Python的一些基礎特性,例如 import 的相對引用和絕對引用的機制等。
本文中沒有說明太多 Orator ORM 的函式用法,主要著重在記錄個人實踐 POC 上的經驗,Orator ORM 的函式用法請查閱 Orator ORM 文件,Orator ORM 文件內的範例和本文略有不同,哪個適合自己就請讀者自行判斷啦!
另外本文也沒有涉及到另一個 ORM 很重要的特性 seeding,seeding 的機制可以讓我們很方便的建構資料庫的基本資料,例如縣市、郵遞區號、國家等等,另外在測試上也會用到 seeding 的機制在資料庫產生測試用假資料,以及測試後把假資料清除的工作,關於 seeding 的操作請見〈Orator ORM 的 Seeding 機制〉一文。


